

OneDrive is Microsoft’s built-in cloud storage service for Windows 10 and Windows 11. While it helps sync files across devices and provides easy cloud access, some users may want to disable OneDrive for various reasons.
Whether you’re trying to reduce background processes, improve performance, or simply don’t use cloud storage, disabling OneDrive is straightforward. In this guide, we’ll explore several methods to disable, unlink, stop syncing, or uninstall OneDrive entirely from Windows 10 and Windows 11.
Why Disable OneDrive?

Although OneDrive integrates seamlessly with Windows File Explorer, there are valid reasons to disable it:
- Performance Optimization: OneDrive syncs files in the background, which can slow down older devices.
- Privacy Concerns: Some users prefer to avoid cloud storage for sensitive files.
- Alternative Cloud Services: Users may already use services like Google Drive or Dropbox.
- Reduced Clutter: Disabling OneDrive removes its icon from File Explorer.
Now let’s walk through the different methods you can use to disable OneDrive on Windows 10 and Windows 11.
How to Disable OneDrive on Windows 10 and 11
Disabling OneDrive can be done through various methods, depending on your preference and Windows edition. The steps below work for both Windows 10 and Windows 11, with minor interface differences.
Method 1: Disable OneDrive from Settings
-
Open OneDrive Settings:
- Click the OneDrive icon in the taskbar (bottom-right corner).
- If hidden, click the arrow icon to reveal background apps.
-
Access Account Settings:
- Click the gear icon > Settings.
-
Unlink OneDrive:
- Go to the Account tab and click Unlink this PC.
- Confirm the action when prompted.
-
Stop OneDrive from Auto-Starting:
- In the Settings window, go to the Settings tab.
- Uncheck Start OneDrive automatically when I sign in to Windows.
What happens after this step?
- OneDrive sync will stop, and the app won’t launch at startup.
- Your files remain on your PC but stop syncing with the cloud.
Method 2: Stop OneDrive Syncing Without Uninstalling
If you want to disable OneDrive sync but still keep the app installed, follow these steps:
-
Open OneDrive Settings:
- Right-click the OneDrive icon in the taskbar and select Settings.
-
Pause or Stop Syncing:
- Under the Sync and Backup tab, click Pause syncing and select a duration (2, 8, or 24 hours).
- To stop syncing folders entirely, click Manage backup and turn off folders like Documents, Desktop, and Pictures.
-
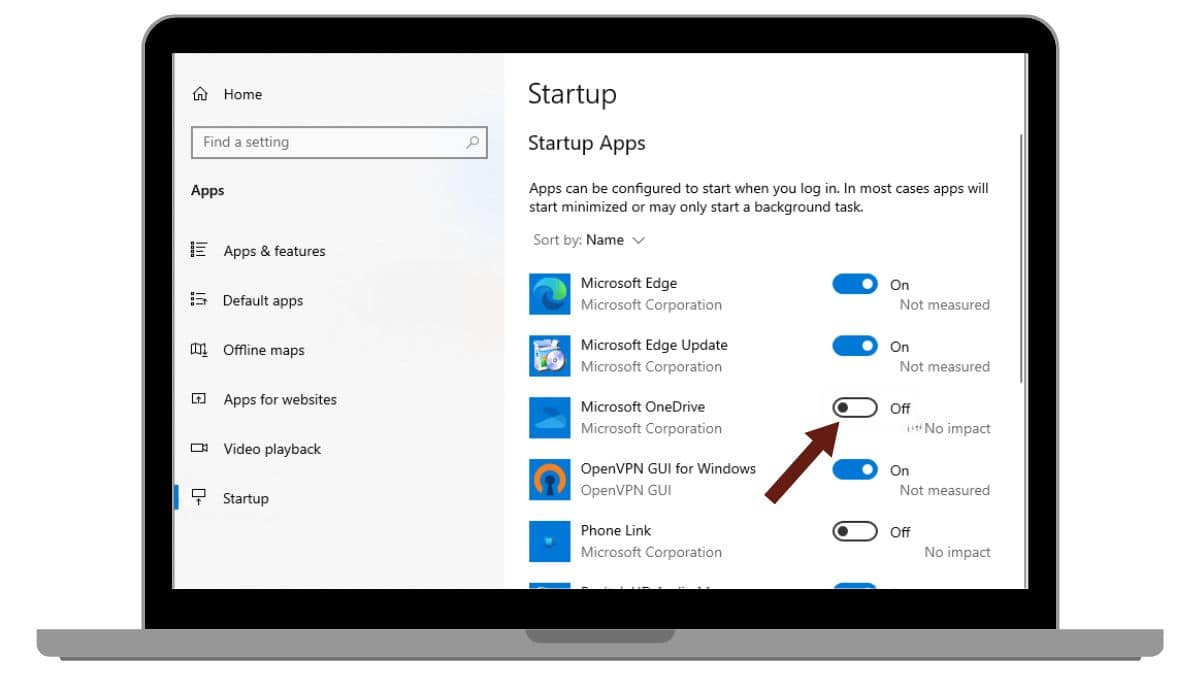
Disable Auto-Start:
- Open Task Manager (Ctrl+Shift+Esc).
- Go to the Startup tab, find OneDrive, right-click it, and choose Disable.
This method is ideal if you occasionally need OneDrive but don’t want it constantly running in the background.
Method 3: Disable OneDrive via Group Policy Editor (Windows Pro)

Group Policy Editor (gpedit.msc) provides a more permanent way to disable OneDrive. However, it’s available only on Windows 10/11 Pro, Enterprise, and Education editions.
Steps to Disable OneDrive via Group Policy:
-
Open Group Policy Editor:
- Press
Windows + Rto open Run. - Type
gpedit.mscand press Enter.
- Press
-
Navigate to OneDrive Settings:
- Go to Computer Configuration > Administrative Templates > Windows Components > OneDrive.
-
Disable OneDrive:
- Double-click “Prevent the usage of OneDrive for file storage”.
- Select Enabled, click Apply, then OK.
-
Restart Your Computer:
- Restart your system to apply the changes.
What happens next?
- OneDrive will be disabled across the system.
- The OneDrive icon disappears from File Explorer.
Method 4: Uninstall OneDrive Completely
If you want to permanently remove OneDrive from your system, you can uninstall it via Settings or Command Prompt.
Uninstall OneDrive via Settings (Simplest Method):
-
Open Settings:
- Press
Windows + Ito open Settings.
- Press
-
Go to Apps:
- Select Apps > Installed Apps (Windows 11) or Apps & Features (Windows 10).
-
Uninstall OneDrive:
- Find Microsoft OneDrive in the list.
- Click Uninstall and confirm the action.
Uninstall OneDrive via Command Prompt (Advanced Method):
If OneDrive persists after uninstalling via Settings, use the Command Prompt:
-
Open Command Prompt as Administrator:
- Press
Windows + X> Terminal (Admin).
- Press
-
Stop OneDrive Process:
taskkill /f /im OneDrive.exe
- Uninstall OneDrive Based on System Architecture
For Windows 10 (32-bit):%SystemRoot%\System32\OneDriveSetup.exe /uninstallFor Windows 11 (64-bit):
%SystemRoot%\SysWOW64\OneDriveSetup.exe /uninstall
-
Restart Your Computer:
- Restart your PC to finalize the uninstallation.
Troubleshooting Common OneDrive Issues After Disabling
Disabling or uninstalling OneDrive doesn’t always go smoothly. Here are some common issues and their fixes:
1. OneDrive Still Appears in File Explorer
Cause: OneDrive registry settings are still active.
Fix:
- Open Registry Editor (
regedit) as an administrator. - Navigate to:HKEY_CLASSES_ROOT\CLSID\{018D5C66-4533-4307-9B53-224DE2ED1FE6}
- Double-click
System.IsPinnedToNameSpaceTreeand set its value to 0. - Restart File Explorer.
2. OneDrive Sync Resumes After Restart
Cause: OneDrive re-enabled during system updates.
Fix:
- Open Task Manager > Startup.
- Right-click OneDrive and select Disable.
- Open OneDrive settings and uncheck “Start OneDrive automatically when I sign in to Windows”.
3. Files Missing After Disabling OneDrive
Cause: Files were set to online-only before disabling.
Fix:
- Re-enable OneDrive temporarily.
- Go to OneDrive settings and choose Always keep on this device for critical folders.
- Wait for the files to sync locally before disabling again.
Conclusion
Disabling OneDrive on Windows 10 and Windows 11 can boost performance, improve privacy, and reduce background activity. Whether you choose to unlink, pause syncing, or uninstall OneDrive entirely, the steps in this guide will help you take control of your system’s cloud integration.
Have you disabled OneDrive recently? Share your experience and tips in the comments below!