
Stacking videos, also known as layering, is a fundamental technique in video editing that allows you to place multiple video clips on top of each other in the same frame. CapCut, a free and user-friendly video editing software, makes this process accessible to both beginners and experienced editors. Whether you’re creating a picture-in-picture effect, overlaying clips, or designing split-screen layouts, this guide will show you how to stack videos on CapCut PC step by step.
What You Need to Start Stacking Videos in CapCut?
Video stacking involves arranging multiple video clips on separate layers within a video editor. The clip at the top layer is visually prioritized, while layers below can be seen if transparency, cropping, or resizing is applied. This technique is widely used for effects like picture-in-picture, side-by-side views, or overlaying graphics and animations. CapCut PC’s timeline feature makes this process straightforward.
Steps to Stack Videos on CapCut PC
Follow these steps to stack videos on CapCut PC: import clips, layer them on the timeline, apply effects, and export seamlessly.

Step 1: Setting Up CapCut on Your PC
Before stacking videos, ensure you have CapCut installed and ready to use. If you haven’t installed it yet, here’s how to get started:
- Download CapCut PC: Visit the official CapCut website and download the PC version. Follow the on-screen instructions to complete the installation.
- Launch the Software: Open CapCut and click on “New Project” to begin. Familiarize yourself with the interface, especially the timeline section, where video stacking takes place.
- Supported Formats: Ensure that the videos you plan to stack are in a supported format, such as MP4, MOV, or AVI. CapCut supports most commonly used formats.
Step 2: Importing Videos Into CapCut
To stack videos, you first need to import your clips into the CapCut library. Follow these steps to upload your videos:
- Click on Import Media: Use the Import button in the media panel to upload the video files from your computer.
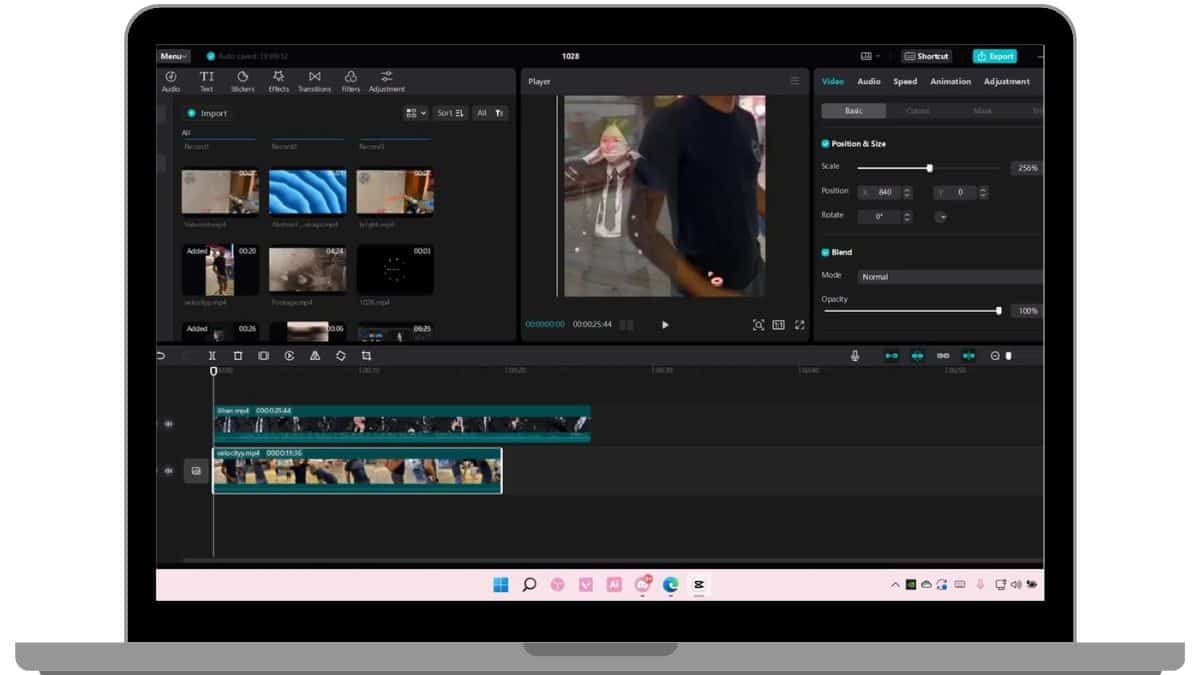
- Drag Videos to the Timeline: Once imported, drag the first video clip onto the main timeline track. Drag the second and subsequent video clips onto additional tracks above or below the main timeline.
For instance, the first clip might be your background video, while the second clip is resized or cropped to overlay on the background.
Step 3: Stacking Videos on the Timeline
CapCut uses a layer-based timeline, where stacking happens by placing videos on separate tracks. Each track represents a different layer in your video:
- Repositioning Tracks: You can drag video clips to adjust their position in the timeline. The higher the layer, the more visually prominent it will be.
- Resizing and Cropping: Select a video clip, then use the handles in the preview window to resize or reposition it. For instance, you can make one video appear as a small box in the corner of another.
- Adjusting Duration: Ensure the duration of all clips is synchronized. Trim or extend the clips as necessary to maintain alignment.
How Do You Add Effects to Individual Layers?
Video stacking becomes even more engaging when you enhance the layers with effects. CapCut provides multiple tools to customize your stacked videos:
1. Apply Filters and Effects
- Select a video clip from the timeline, and navigate to the Effects Panel.
- Choose from a wide range of effects to apply to specific layers, such as color grading, motion blur, or glitch effects.
2. Adjust Opacity
- Lower the opacity of a top layer to create a transparent overlay effect. This is useful for blending videos or creating a ghostly effect.
3. Use the Chroma Key Tool
- If one of your videos has a green or solid background, apply the chroma key tool to remove the background and seamlessly integrate it with the layer below.
4. Add Text or Animations
- Overlay text, subtitles, or animations on individual video layers for an engaging visual effect.
5. Experiment With Masks
- Use the mask tool to create specific shapes or areas in a video layer, such as circular overlays or split-screen effects.
Exporting Your Stacked Video on CapCut PC
Once you’ve finalized your video stacking and applied the necessary effects, it’s time to export your project:
- Preview the Video: Play back your video to ensure all layers align and effects are functioning as intended. Make any last-minute adjustments to timing or positioning.
- Export Settings: Click the Export button in the top-right corner of the interface. Choose the resolution (e.g., 1080p or 4K) and file format (e.g., MP4).
- Save Your File: Select a destination folder and export your video. Depending on the complexity of the layers, this process might take a few minutes.
Troubleshooting and Common Issues
If you encounter challenges while stacking videos in CapCut, here are some solutions:
- Videos Not Aligning Properly: Ensure all video layers are trimmed or extended to the same length in the timeline.
- Performance Lag: If CapCut runs slowly, lower the playback quality to preview the video more smoothly.
- Effects Not Applying: Make sure the correct video layer is selected when applying filters or effects.
- Export Issues: Check your export settings, ensuring your selected resolution matches your project requirements.
Conclusion
Stacking videos on CapCut PC is an accessible way to enhance your video editing projects. With its intuitive timeline, powerful tools, and effects, CapCut makes layering multiple videos easy for users of all skill levels. Whether you’re creating dynamic overlays, split screens, or picture-in-picture effects, this guide has covered everything you need to get started. Experiment with the tools and share your unique creations! If you found this guide helpful, share it with other video enthusiasts or leave your questions in the comments below.