cPanel is the most common website control panel out there. It is primarily written in Perl and only supported by Linux hosting servers, which represent over 96 percent of the world’s top 1 million web servers.
Chances are the web hosting plan you just purchased, or considering buying would offer cPanel as the web-based graphical user interface for managing your hosting services.
From creating custom emails to uploading your website files, adding more domains, and installing WordPress to your website, cPanel is a convenient, user-friendly interface to perform all tasks related to website development and management.
It will discuss what Linux hosting means and the benefits for WordPress users, what cPanel is, how to use cPanel, setting up your website with cPanel, configuring your domain, and many more on cPanel.
What is Linux hosting?
Linux hosting is any type of web hosting which its servers use Linux as their operating system. Since first developed by Linus Torvalds in 1991 as an open-source operating system, Linux has become more popular as web servers’ platform and runs on 100% of the world’s supercomputers. This is wide because Linux hosting is considered more reliable, flexible, secure, and cost-efficient, to mention a few.
Linux hosting is also the only hosting service with support for cPanel web hosting control panel mostly preferred by webmasters. The best example that I can give for Linux hosting is GreenGeeks. It is one of the best Linux hosting services that provides its own virtualized file system to protect your data against malware and other malicious activities. Don’t miss to grab the GreenGeeks discount and be confident that your business site is secure and live.
What is cPanel?
cPanel is a web-based application that allows you to manage all elements of your website hosting account. The interface will enable users to have full control of their web hosting account, efficiently administering all aspects regardless of their computers’ operating system from which they are using to access their hosting accounts.
Many hosting companies prefer using cPanel as their clients’ interface for managing their hosting accounts because it’s reliable, easy to learn and use, saves money and time, and has options to integrate third-party software for web development.
Though many beginners are more focused on Content Management Software (CMS) such as WordPress, which powers about 34 percent of the internet, understanding the benefits of a web hosting control panel over another is also essential while choosing a hosting plan.
cPanel benefits for WordPress
User-friendly automatic update configuration
Website maintenance is a crucial factor to consider while developing a website, and this includes keeping your website software updated to remain secure. Thankfully, you can easily configure your cPanel to install security updates each time they’re available automatically. And the setup is straightforward.
Easily reset administrator passwords
While WordPress operates on your hosting platform as a content management system, resetting the passwords of your admins every now and then is an inevitable request to deal with. This issue is totally solved by the cPanel WordPress manager, which offers a one-step process to reset or change the password of any of your WordPress accounts.
The improved site development process
Though this is still an upcoming feature, it’s worth mentioning. One of the major challenges webmasters face while upgrading a website, such as changing the theme or including more services, is the risk of updating sites with errors or having to take them down to perform these upgrades.
To prevent this challenge, developers perform the upgrade on a non-live version, which would replace the website when the update is completed. But the process is not swift. cPanel WordPress manager is coming up with a feature that would perform the siteswap with a single click.
Aside from the benefits listed above, cPanel allows you to have full control of your WordPress and to manage all aspects, including domains, email, security, and script editing.
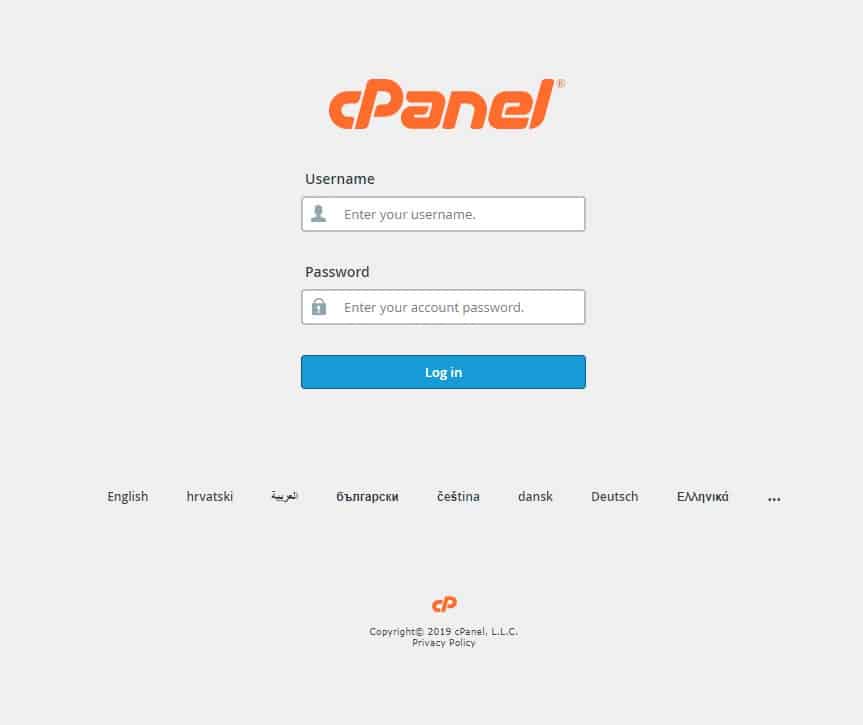
How to login to cPanel
When you purchase a Linux hosting plan, the hosting company will provide a link to your cPanel in your membership dashboard, i.e., when you log in to the company’s service website. They should also provide you with a username and password, which would grant you access to your hosting control panel directly without having to log in to the hosting company’s website.
However, the company may not provide a direct address to your control panel when you sign up with the notion that you know how to access your cPanel. You may have to contact their support team for the link or try the following links.
http://www.yourwebsite.com/cpanel
Or
http://www.yourwebsite.com:2082
Or
https://www.yourwebsite.com:2083
Note: replace yourwebsite.com with your real domain name.
One of these pages should load and request for your cPanel username and password. Supply the information and click on the login button.
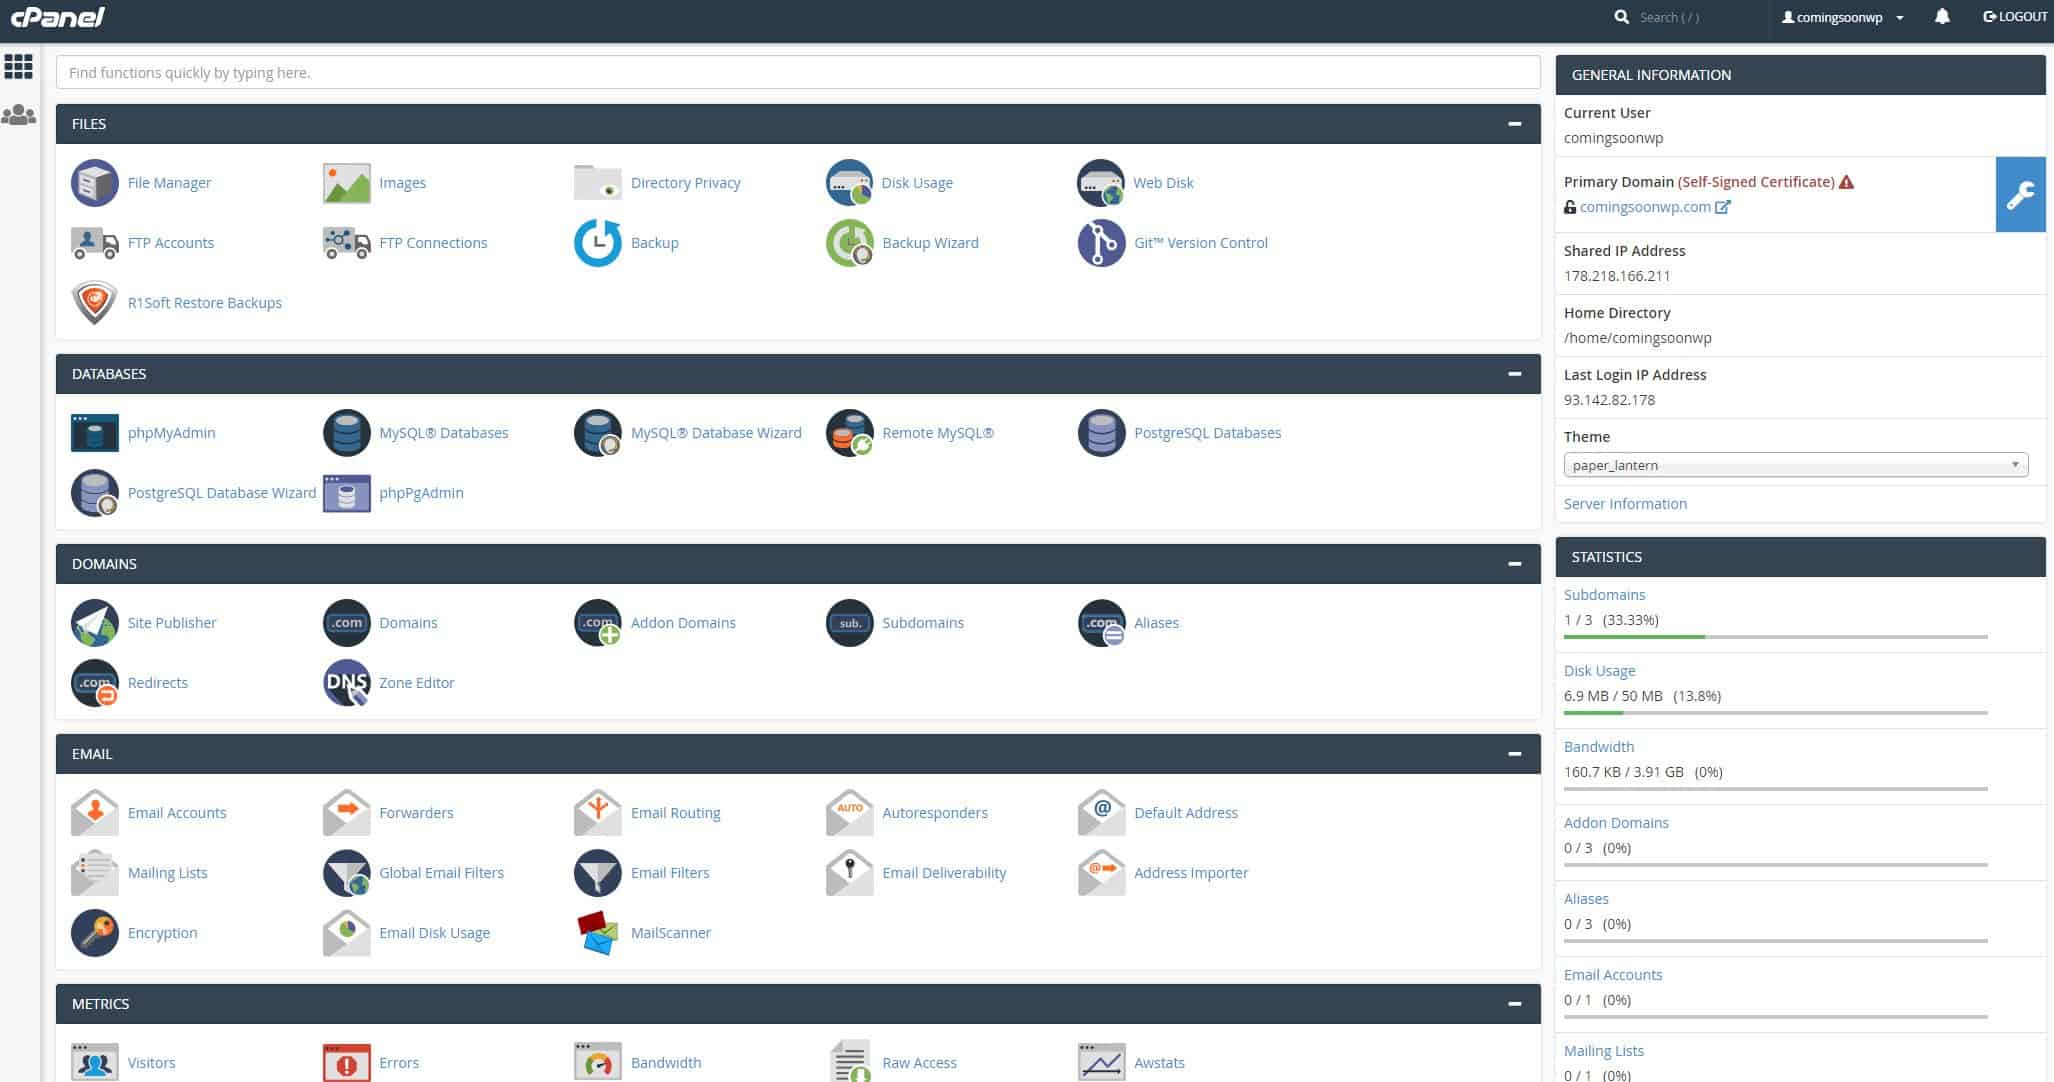
Introduction to cPanel interface
Successful login should load your cPanel homepage (dashboard), which displays about 11 expanded cPanel sections: files, database, domains, email, metrics, security, software, advanced, preferences, softaculous and applications. A sidebar on the right should display your account’s general information and statistics, while a smaller bar on the left would have a few icons.
cPanel interface functions and sections
Account information section
This section is recently, according to the 2019 version, at the top of the right-hand bar. The column provides information about your cPanel account:
- Username
- Primary domain
- Home directory
- Last login IP address
- Theme
Account statistics section
Below the account information is where you can monitor your account resource usage. Each resource shows you how much you have used out of the total amount purchased. Information here includes:
- Disk Usage
- Bandwidth
- Addon Domains
- Subdomains
- Email Accounts, etc.

Navigation bar
The navigation bar is at the top corner of the homepage. It’s the scroll-locked bar with the logout link, a notifications bell, user preferences, and a search field (from right to left).
- The logout link: to be used each time you are done working with the cPanel.
- Notifications bell: gives you alert on essential updates about your cPanel or hosting service. You can receive information about security concerns, news, or crucial cPanel updates.
- User preferences: it opens a drop-down with a link for changing your cPanel password, language, your contact information, and reset the page setting (back to default).
- The search field: provides a direct or quicker link to all the available cPanel features, instead of having to browse through the sections each time you want to access a feature. You don’t need to type the entire name of what you want; the field has an auto-complete feature that suggests all possible results of the typed letters.
Left sidebar
You should see a smaller bar (in terms of column) on the left side of your cPanel homepage with a few icons, which depends on what your host provides. From the top-down, you may see just the home button, which takes you to the cPanel homepage and the user manager button where you can add or remove users from your cPanel account. The user manager will also allow you to access your existing email accounts, FTP, and your web disk in case you are sharing your account with other admins or users.
The left sidebar may also contain statistics icon where you can view your account resource usage information, just like those on the right sidebar. Information here will include bandwidth, number of domains, FTP accounts, disk space, etc.
Search bar
There’s another search field below the navigation bar at the top of the homepage. This field is also to help you find functions quickly. Unlike the navigation bar search field, which shows a search result in a drop-down, it filters the cPanel features for those related to whatever you type into the search box.

How to use cPanel
Your cPanel homepage might look a little different from the descriptions and available screenshots here. However, you can be sure it’s only a few additions or as a result of how your cPanel features are organized. The sections can be re-organized by dragging the icons. This is to help you place your most frequently used features at the top or somewhere you can access easily. Also, you can collapse the sections by clicking on the minus (-) on the right-hand side of each section. A click on the plus (+) sign will undo the process – expand the features.
How to change your cPanel password
There is a need to change your password the first time you get into your cPanel. For security reasons, it’s also recommended that you change your cPanel password periodically, maybe once in a month. To do so, click on the username or “User Preference” on the navigation bar > “Password and Security,” the password change page will load.
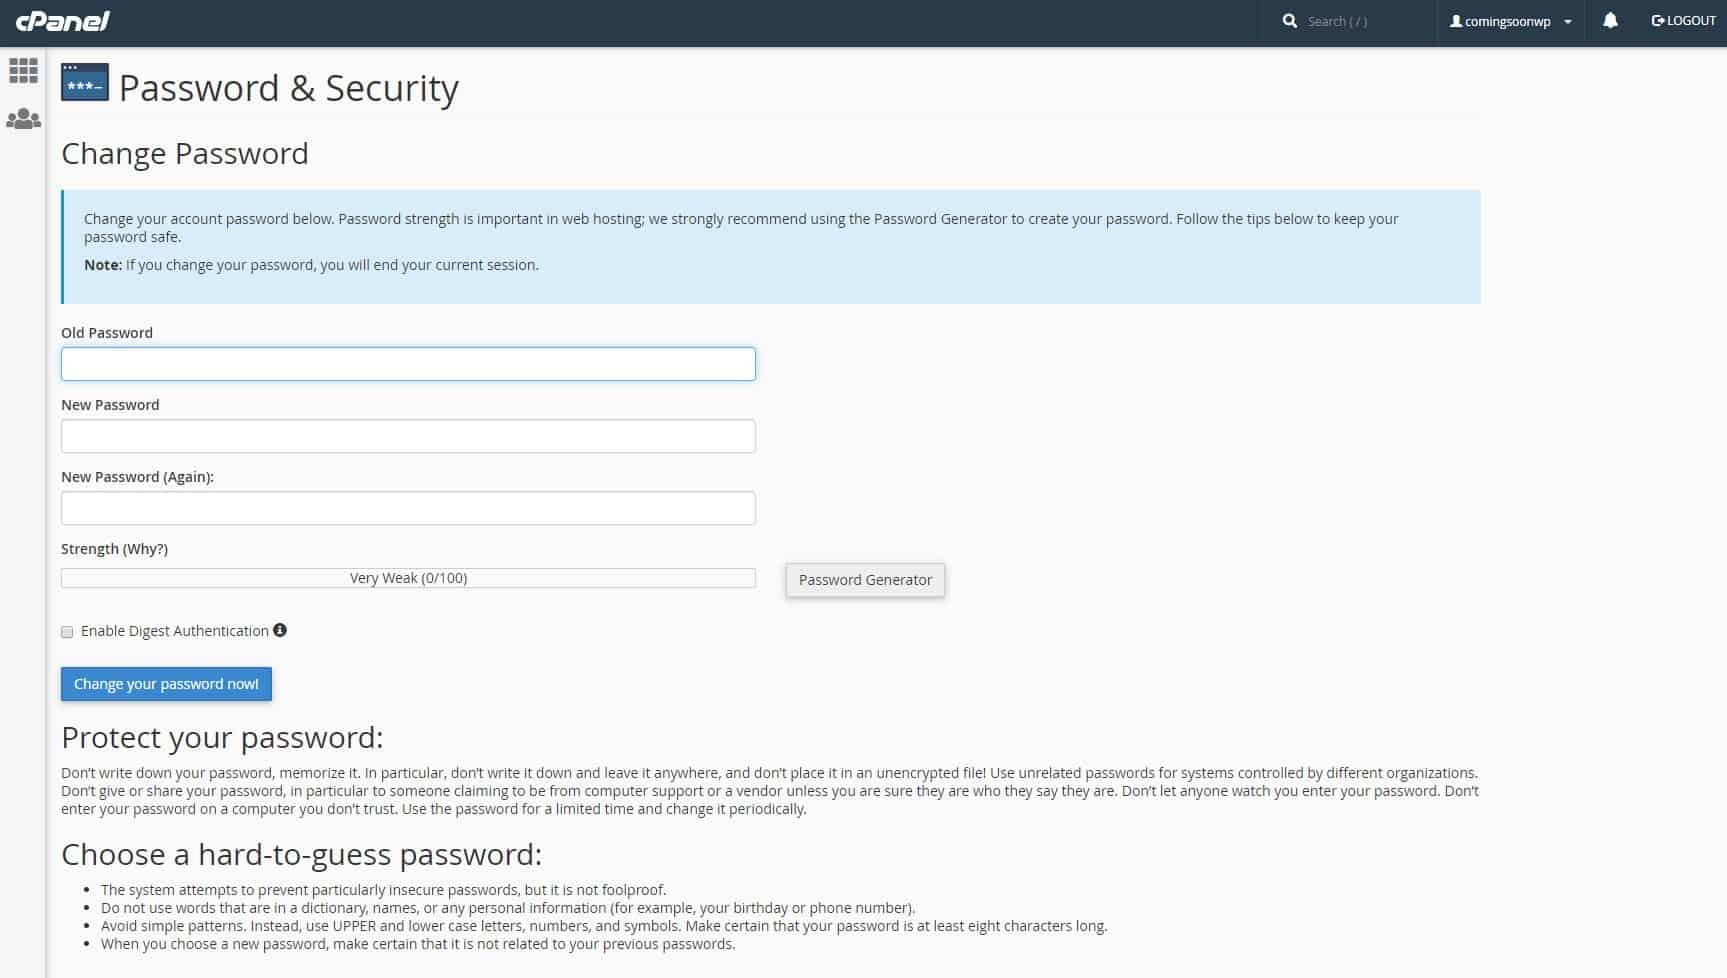
Note: changing your cPanel password will end your current session. Hence, you’ll be required to log in again if you wish to continue using your control panel.
Enter your old password in the “Old Password” box at the top and enter your new password in the “New Password” boxes.
Note: you must choose a hard-to-guess password to continue the process. Therefore, you may have to use the “Password Generator” to automatically generate a strong password.
To use the “Password Generator,” click on the feature’s button. At the pop-up window, click “generate password” and copy the generated password to a safe place. Click the “Use Password” button after checking the box confirming you have copied the password in a safe place.
You don’t need to check the “Enable Digest Authentication.” It is only required if you wish to access your web disk through an unencrypted connection using a lower version of windows (from Windows 8). It is unnecessary if your server has an SSL certificate signed by a recognized certificate authority.
Click on the “Change Your Password” button to complete the process.
How to protect your cPanel password
For maximum security, you are advised not to save your password on your computer. And considering what makes a strong password, it should be something you don’t want to memorize it.
Your best option is a password manager, which keeps track of your various usernames and passwords on different websites. Password managers out there to choose from include LastPass, LogMeOnce, Norton’s identity safe, and Dashlane.
How to update your contact information on cPanel
cPanel uses your contact information to notify you of important updates. Therefore, it’s obligatory always to have your current email there. You are advised to use any email address connected with your domain, not an email on the domain you are managing, so you don’t lose any important update when the domain is down or encounters problems such as a full mailbox.
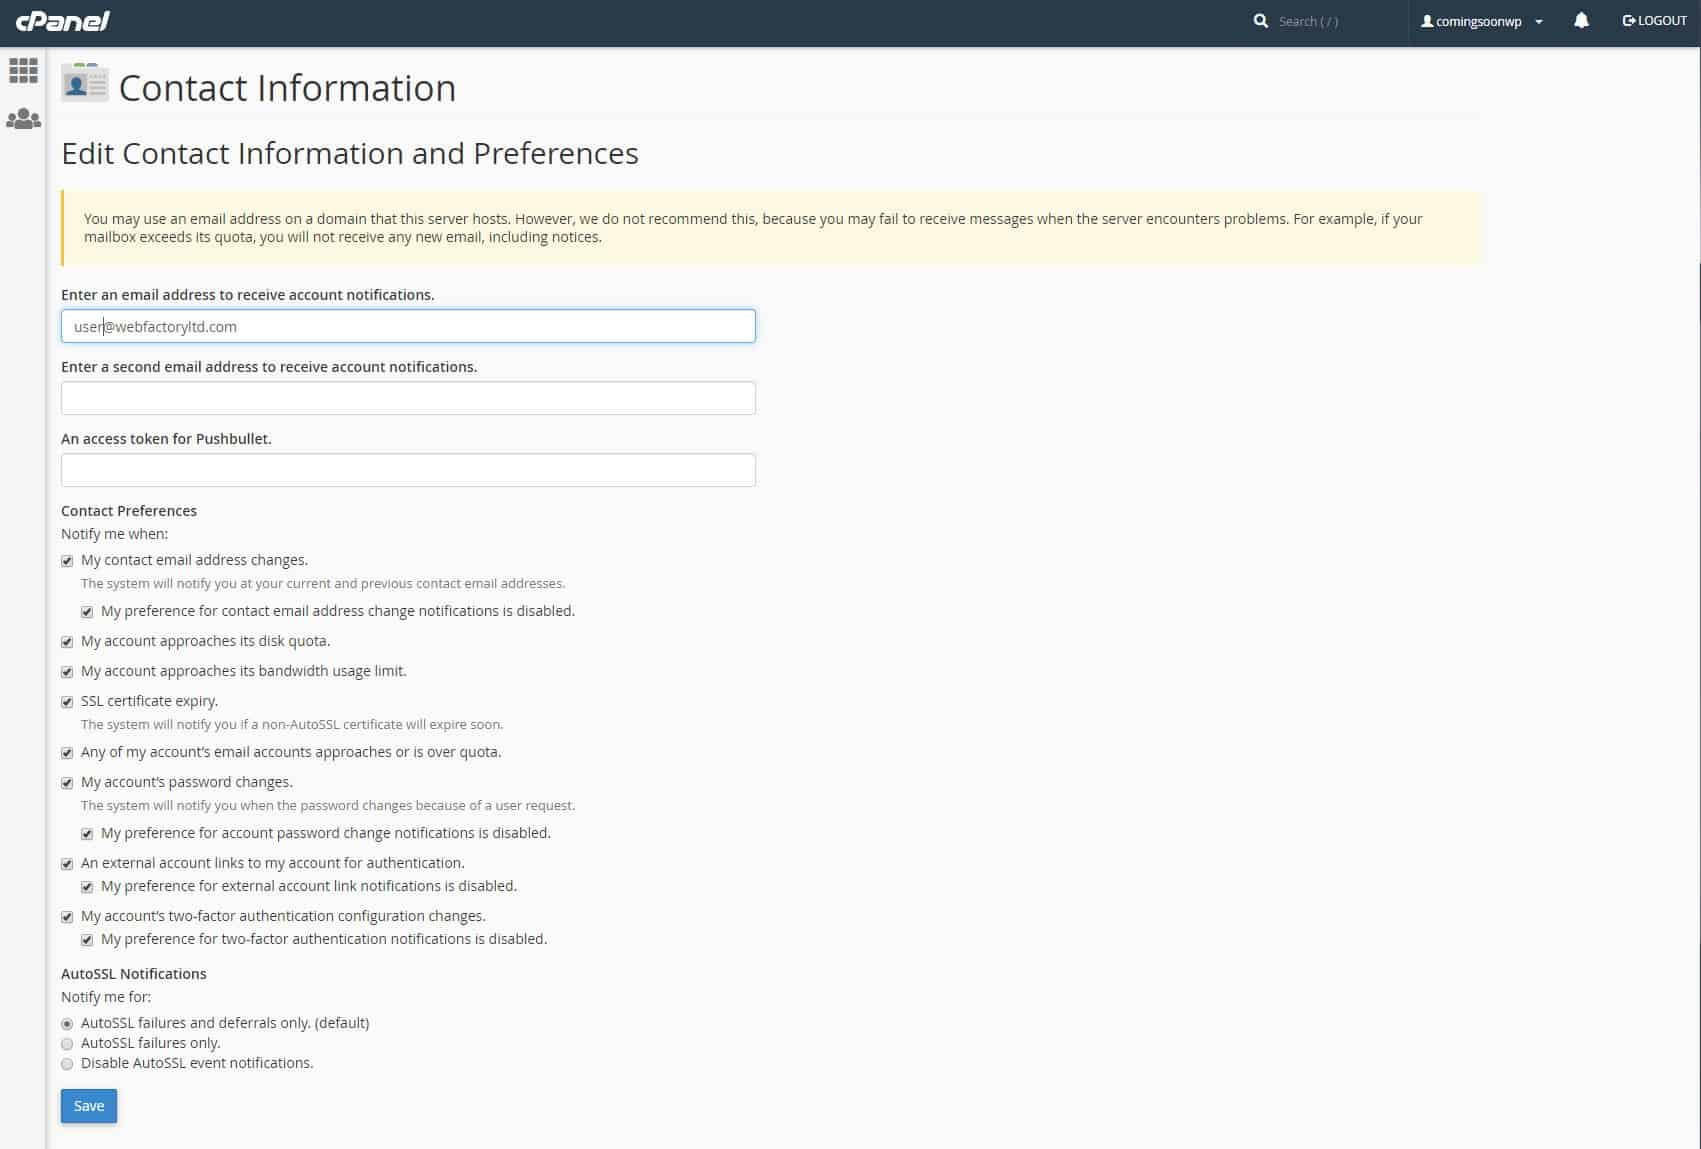
Follow these steps to update your cPanel contact information.
- Click on the username or “User Preferences,” > “Contact information.”
- Enter two different email addresses that would receive the notifications.
- Select all the checkboxes under “Contact Preferences.”
Selecting them [the check boxes] allows you to receive notification about any suspicious activity on your hosting account, such as a change to your account contact email address or account password.
- Click on the “Save” button at the bottom of the page to complete the process.
cPanel user management
The user manager is relatively a new feature introduced to allow hosting service clients to control all users in their account using a single interface. The feature allows you to add, remove, and to edit a user’s resources. You can also change their passwords and also grant them access to FTP and email account.
How to add a new user on cPanel
Follow these steps to create or add a new user to your cPanel account.
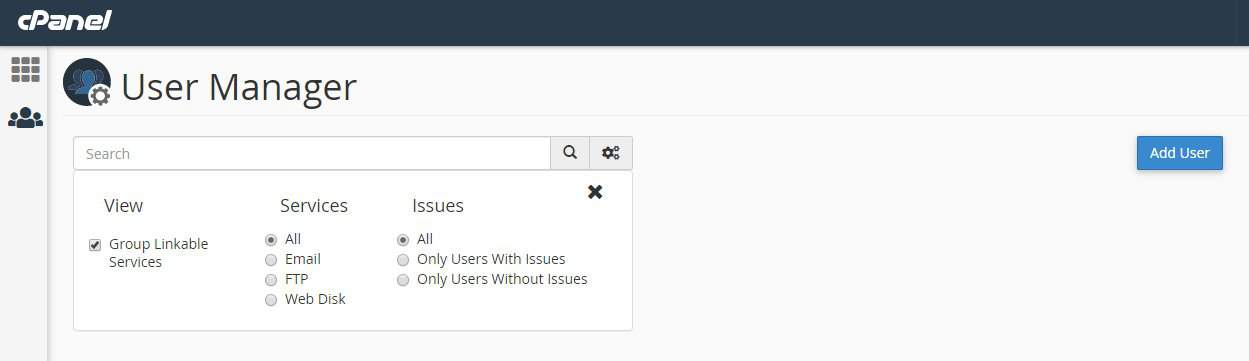
- Click on the “User Manager” icon at the left sidebar. This should load the User Manager page.
- Click on the “Add User” button, top-right of the page
- Under the section for basic information, enter the user’s full name, username, and contact email address accordingly in the provided fields.
- You need to assign them to a domain if you have multiple domain names in your hosting. This can be done by clicking on the dropdown against the “Domain” field and selecting the domain of choice.
- Under the security information section, you have the option to either set the user’s password or allow them to set the account password. Choose one by selecting the field.
- By selecting to set the user’s password, you will see two fields to enter the password. Enter the password or click on “Generate” to automatically create a strong password.
- You can adjust the generate password option by choosing the password length and if you wish to include letters, symbols, and numbers in the password.
- Copy your password to a safe place and enter the password in the “Confirm Password” box.
- Choose the services you wish to associate with. They include email, FTP, and web disk. You need to click on the switch next to the service description to enable or disable them.
- Assign them a quota or permission level. For web disk, a read-write option allows the user to view and edit contents in the directory, whereas read-only will allow them only to view and download files but not edit them.
- Click on the “create” button at the bottom of the page to complete the process.
How to delete/edit a user account on cPanel
This option would allow you to change the user’s password and services. Follow these steps to do this.
- Click on the “User Manager”
- To delete an account, find the account name on the list of users available and click on delete link under them
- cPanel will request a confirmation to complete the process. Click on the “Delete” button to confirm the process.
- To edit an account, click on the edit or change password link under the account name.
- Choose the services you wish to enable or disable. Enter a new password if you wish to change the account’s password
- Click on the “Save” button down the page to complete the process.
Domain management
This section is useful when you want to manage redirections, create a subdomain, or add another domain for building a new website.
Note: only hosting services with support for multiple domain names can allow you to add a new [Addon] domain. Subdomain, redirects, and other domain management-related features should be available in all hosting plans.
How to add a new domain name
- Find the domain section on your cPanel or type domains on the search bar.
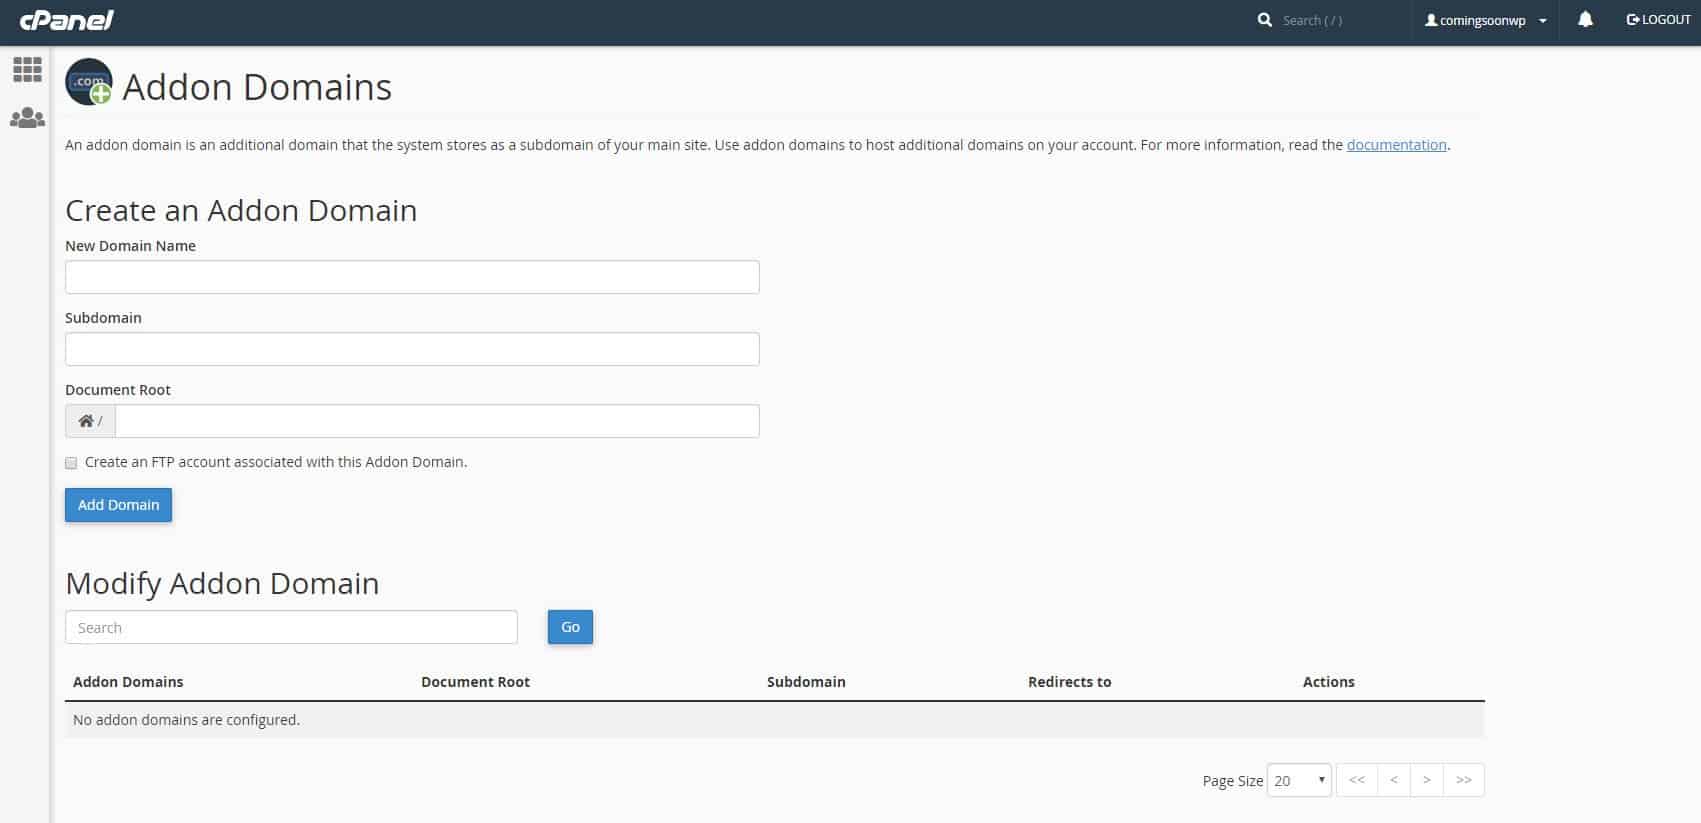
- Click on the “Addon Domains” icon. This should load a page to create an addon domain.
- Enter your domain in the “New Domain Name” box
- Hit the tab key to generate the “Subdomain” and “Document Root automatically.”
- If you want to create an FTP account for the addon domain, check the box under the “Document Root” box. And enter the FTP username and password in the provided fields.
- Click on the “Add Domain” button to complete the process.
New Domain Name field is asking for exactly the domain name you have registered without www.
Subdomain field is used by cPanel for some internal routing. It is generated automatically.
Document Root field is referring to the location where cPanel would place all files related to the domain. It’s also generated automatically by cPanel.
How to remove a domain name
- Click on the “Addon Domain” icon
- Scroll down to view a list of the existing addon domains
- Find the domain you wish to remove and click on the “remove” link under the “Actions” column and on the same row with the addon domain you wish to remove.
How to create a subdomain
Subdomains are websites existing under your main website. To create a subdomain on your cPanel, follow the steps below.
- Click on subdomains under the domains section
- Enter the subdomain name in the “subdomain” box
- Hit the tab key to generate the “Document Root automatically.”
- Click on the domain dropdown to select the domain name your subdomain would be placed under. That’s if you have multiple domain names.
- Click on the “create” button to complete the process.
How to create a redirect on cPanel
- Click on the “Redirects” icon in the Domains section
- Select your redirects type from the dropdown menu. If it’s permanent (301) or temporary (302)
- Select the Domain Name you wish to redirect from the dropdown menu with a list of domain names in your account. Specify the directory [if applicable] in the box below.
- Enter the URL you wish to redirect your visitors to, specifying the protocol (if they are https or http)
- Select the www. redirection
- Only redirects with www. means the redirect will occur only if the users include www. in the URL
- Redirect with or without www. means the redirect will occur whether the user includes www. or not.
- Do Not redirect with www. means the redirect won’t occur if users include www. in the URL.
- Wild Card Redirect will redirect all the pages in a directory to your redirect destination regardless of the page specified in the directory.
Email management
One of the features that prove the self-sufficiency of a brand is custom email accounts, though some hosting plans (very few) don’t include email features. The cPanel allows you to create and manage custom email accounts through the “Email” section.

How to create an email account
- Click on the “Email Accounts” icon under the Email section
- Click on the “CREATE” button at the right-hand side of the page
- Enter the email name that would follow @yourwebsite.com in the email field. This could be “info,” “inquiries,” “sales,” etc.
- Choose a strong password or use the “Password Generator” feature to create a password. Or select the “provide alternative email” option and provide the email where cPanel would send the password configuration link to.
- Enter Mailbox quota; how much space you wish to allocate for the email (in MB) or select the unlimited quota.
- Click on the “Create” button down the page to complete the process.
How to access your email account
You can access your email accounts through your cPanel or webmail directly.
Using your webmail through cPanel
- Click on the “Email Accounts” icon under the Email section
- Find the email account you wish to access and click on the “Check Mail” link on its row. This may provide an option to choose a default email client for your emails.
- Choose any of the Webmail applications, and the email will load automatically.
Using webmail directly
You can access your email account without logging into the cPanel using the following steps
- On your address bar, enter yourwebsite.com/2092 or yourwebsite.com/webmail and hit the enter key. This will load your webmail login page.
- Enter your email username and password
- Click the “log in” button
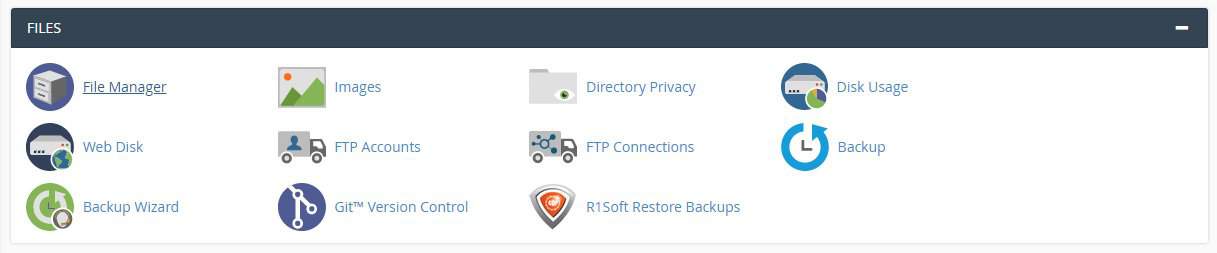
File Manager
The “File Manager” is the most basic feature you want to first become familiar with, in the “Files” section of your cPanel. Rather than using a third-party FTP tool, you’ll find it more convenient to directly manage all your website files using the “File Manager.”
A click on the “File Manager” icon would take you to a page where you can view all the files on your website, arranged adequately in different directories. Hence, there’s a need to perform any changes here with extreme caution.
How to create a new folder
- Click on the “File Manager” icon in the “FILES” section of your cPanel dashboard.
- Click on the “+ folder” icon on the file manager menu bar. This will trigger a pop-up asking for the file name and directory you want the folder to be created in.
- Enter the folder name and directory accordingly.
- Click on the “Create New Folder” button.
How to upload a file using the file manager
- Click on the “File Manager” icon in the “FILES” section of your cPanel dashboard
- Click on the “Upload” icon on the file manager menu bar. This will open a window that will enable you to “Drag and Drop” or select the file you want to upload.
- Check the “overwrite existing file” box if you want the file manager to overwrite files with the same name automatically.
Note: It is recommended to use your website content management software for file uploads since you are going to use the files on your website. Uploading with CMS makes it easier for the website software to locate and use the files other than those uploaded using a File Manager or FTP.
File Transfer Protocol (FTP) accounts on cPanel
You might be able to access your FTP account using the same username and password for your cPanel. This depends on how your hosting company has setup your account. However, all file uploads using third-party apps must be done using an FTP account.
To find out if your cPanel login details could perform FTP-related tasks, click on the “FTP Accounts” in the “Files” section on your cPanel dashboard and scroll down to “Special FTP Accounts” to see if your cPanel username is included there. If not there, you must create an FTP account before you can manage your website files using FTP.
How to create a new FTP account
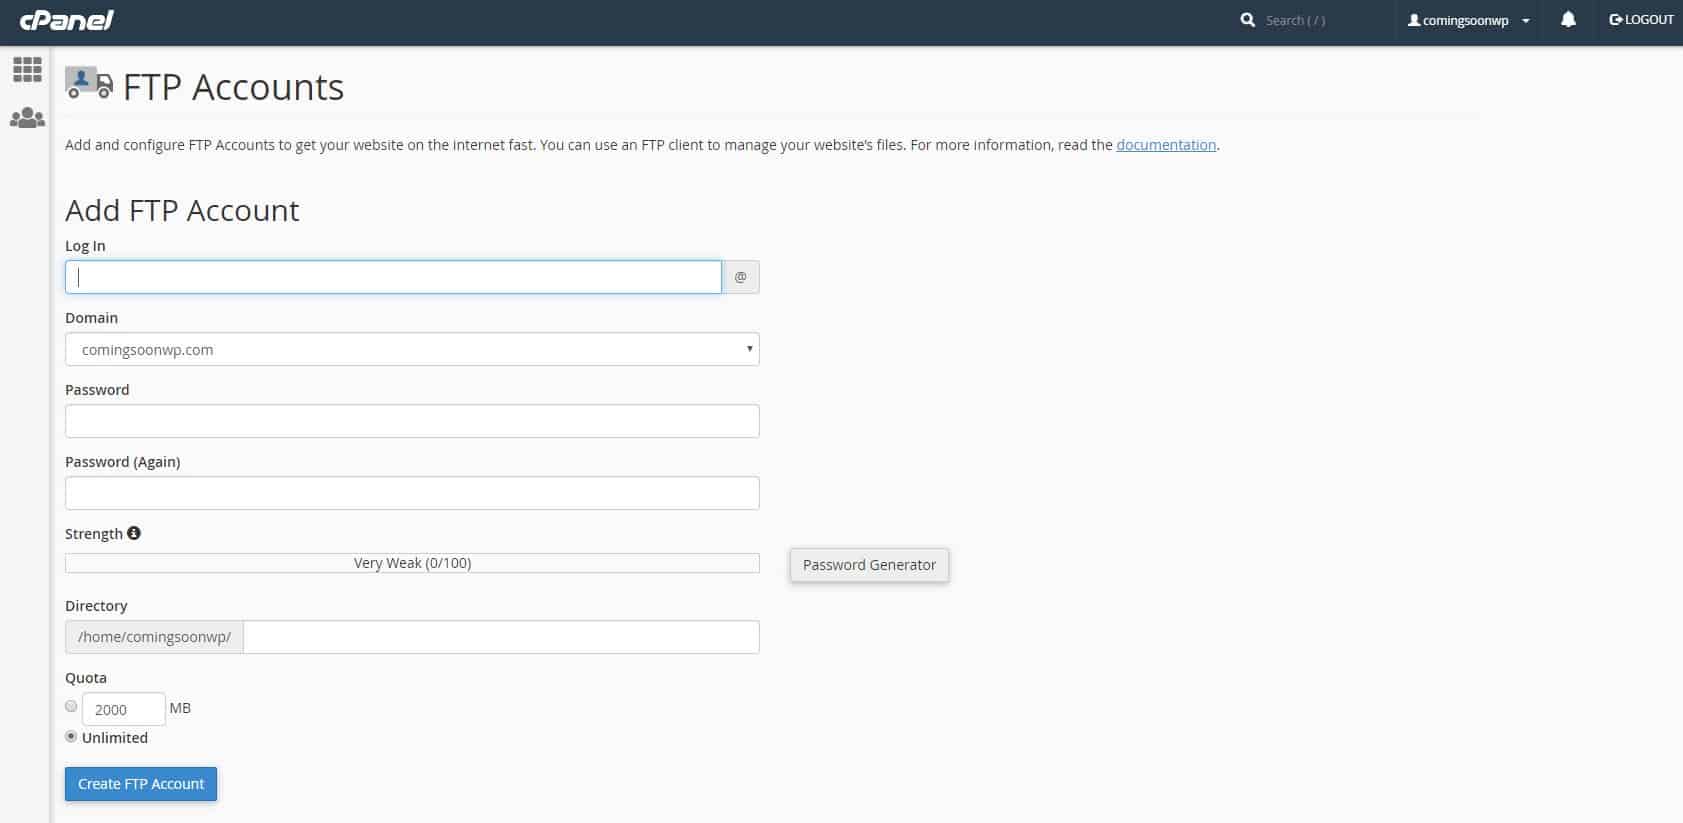
- Click on the “FTP Accounts” icon in the “Files” section on your cPanel dashboard. This should load a new page with a form to create your new FTP account.
- Enter your preferred FTP account username in the “Login” field
- Choose a strong password or use the “Generate Password” feature to generate a suitable password.
- Enter the directory associated with the project that requires the FTP account in the directory field or leave the box blank if you want the user to have access to all the directory levels on your website.
- Enter the maximum space you want the user to take up (in MB) under the quota section or check the unlimited field to grant the user an unlimited space volume.
- Click on the “Create FTP Account” button.
You can also manage the existing FTP accounts on your website using the same page (FTP Accounts).
Database Management
Nearly all websites out there have a database where their contents are managed and sorted for ease of access. And cPanel has quite an extensive module for creating and managing databases, though content management systems, most times, handle the process of database management, the feature is much accessible through the cPanel dashboard.

How to create a database
- Click on the “MySQL Database Wizard” in the “DATABASES” section on your cPanel dashboard.
- Enter a name for your database in the “New Database” box and click on the “Next Step” button.
- Create database users for the database. This will require you to provide the database user login details and to click on the “Create User” button.
- Assign privileges to the user. Check the “All Privilege” field if you want the new database user to have privileges. Otherwise, check all the privileges you want them to have and click on the “Next Step” button to complete the process.
How to rename/delete a database
- Click on “MySQL Databases” in the “DATABASES” section on your cPanel dashboard.
- Scroll down to the “Current Databases” section for a list of all the databases on your website.
- Find the database you wish to rename or delete.
- Under the “Actions” column and on the same row with the targeted database, click the rename link or the delete link to execute any of these tasks.
Softaculous Apps Installer
Softaculous Apps Installer section on your cPanel dashboard allows you to install applications in just a few clicks. As an auto script installer, this feature allows you to install most JavaScript, PHP, and Perl applications without having to upload the files or a need to create a database before installing them.

How to install WordPress
- Find the WordPress logo or icon in the “Softculous Apps Installer” section, under the script roll, on your cPanel dashboard.
- Alternatively, if you can’t find the WordPress logo in the section, click on “blogs” under categories in the “Softculous Apps Installer” on your cPanel and find the icon.
- Click on the WordPress icon. This will load a page with a little description of WordPress and a link to begin the installation.
- Click on the blue “Install Now” button and fill the form.
- Choose the version you want to install. Always install the latest version, which is usually the highest number in this dropdown menu.
- Choose Protocol. Please select the https:// if you have an SSL certificate. Otherwise, your option is the http://.
- Choose Domain. Select the domain name you wish to install WordPress in the dropdown menu.
- In Directory. This box should be empty if you are installing WordPress to your root domain, such as com. However, if you are installing WordPress to a directory in an already existing site, you need to enter the path in this box.
- Site Name. Enter the name you wish to call your website. This can be changed later.
- Site Description. Provide a suitable description for your site or leave it blank for now.
- Enable Multisite. This can be changed later. It’s a feature that allows you to run more than one WordPress installation on one domain.
- Admin Username. The username you choose here is very important and cannot be changed. You want to choose a username that would be difficult for hackers to guess while breaking into your website — leaving it as admin is fine but not security-wise.
- Admin Password. A strong password is recommended here. However, you are recommended to change your password regularly.
- Admin email. Enter a working email. This can be changed later.
- Click on the “Install” button.
cPanel Backups
cPanel backup generates a copy of all your website files, including emails and databases. Once you begin a backup, you must allow the process to complete, after which the server can send you an email notification that the backup is ready for download.
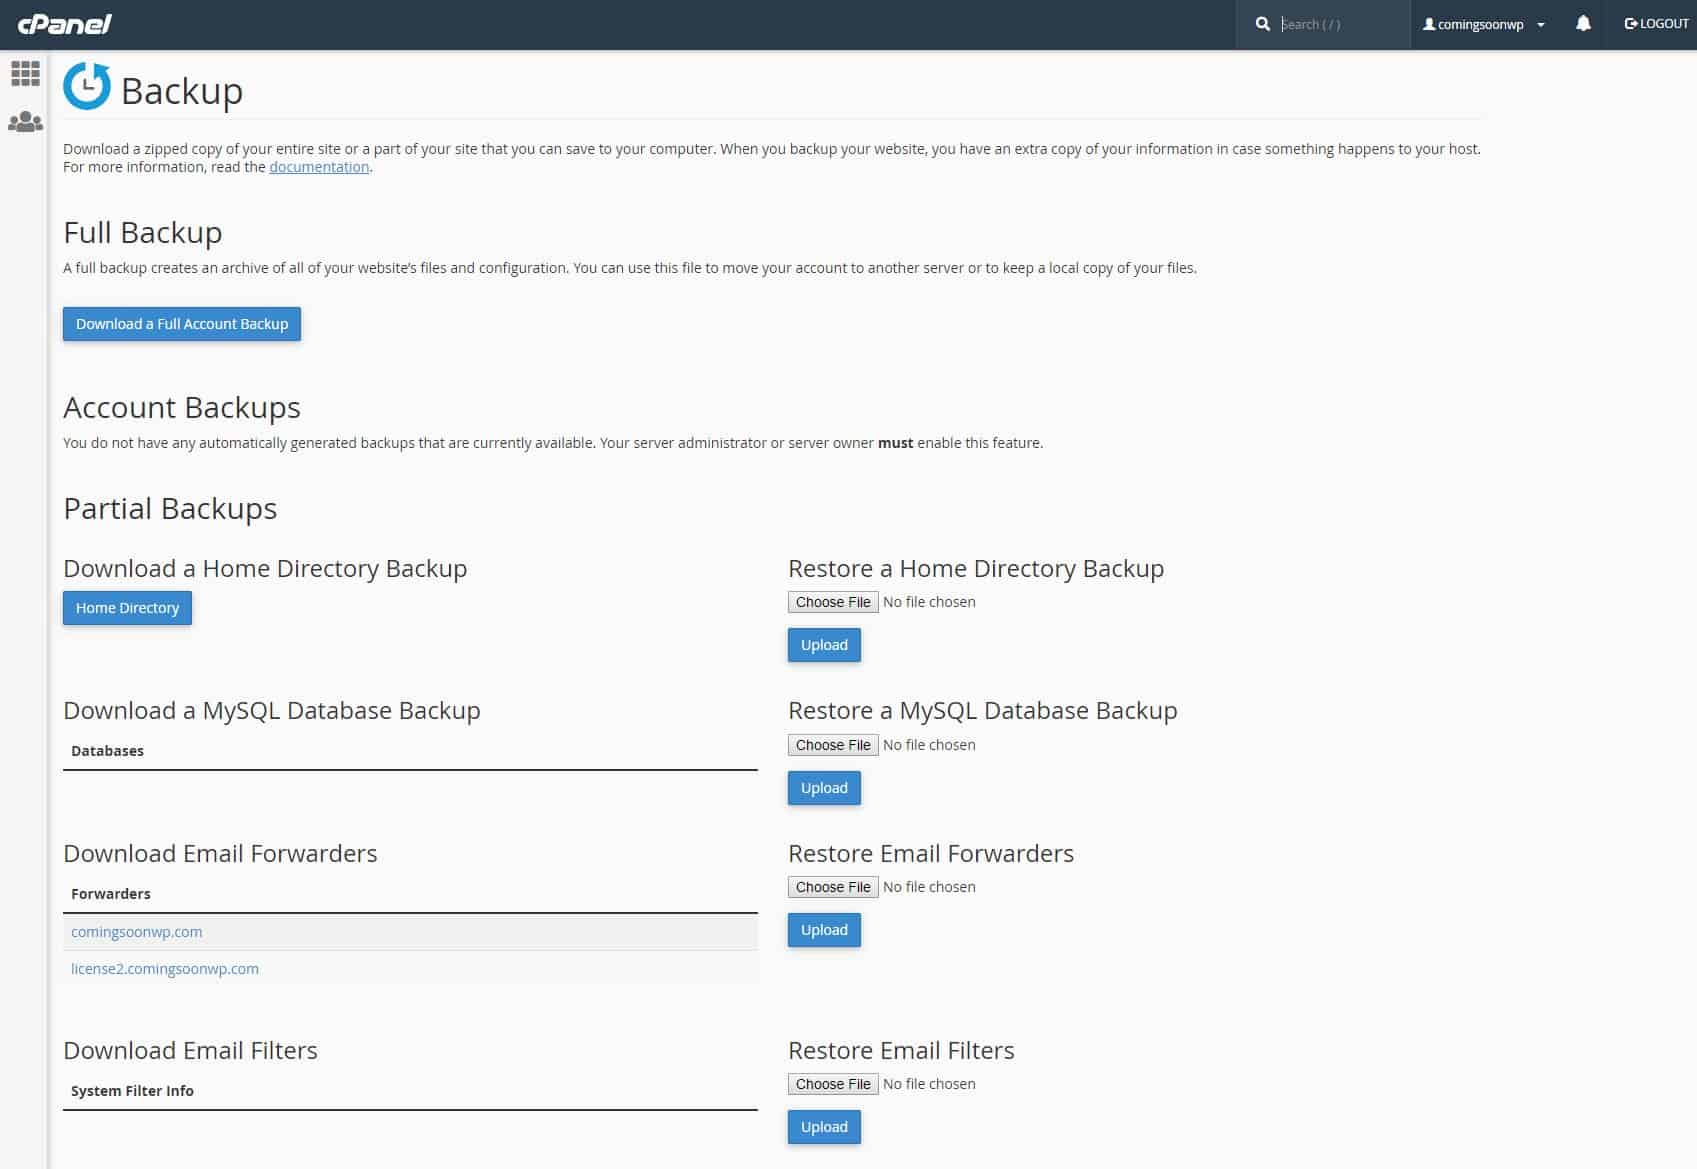
How to generate a full backup
- Click on the “Backup” icon under the “Files” section on your cPanel dashboard. This will load the backup page.
- Click on the “Download a Full Account Backup” button.
- Select the Home Directory option from the dropdown menu under the backup destination
- Select if you wish to receive an email notification or not
- Click on the “Generate Backup” button
How to download the full backup
- Click on the “Backup” icon under the “Files” section on your cPanel dashboard.
- Click on the “Download a Full Account Backup” button. You’ll see the available backups ready for download.
- Click the link for the backup file you want to download.
- Choose the file’s destination on your PC and click on save
Partial backups can be performed by clicking on the “Home Directory” button under the “Partial Backups” section.
Wrapping up
cPanel is an easy-to-use web hosting control panel with several interesting features included for improved web development experience. There’s still a long list of other features not mentioned in this beginners’ guide to Linux hosting. However, this quick tutorial on how to use cPanel is enough to guide anyone in setting up their Linux hosting environment and to have their first websites running perfectly well.
Please leave a comment below if there’s anything on cPanel that’s still confusing or not mentioned in this beginners’ guide.
Published on November 11, 2019 under cPanel, how to use cPanel, Linus hosting. Modified on October 5, 2020.